PyMongo Monday – Episode 3 – Read

20180927_173519

Previously we covered:
* Episode 1: Setting Up Your MongoDB Environment
* Episode 2: CRUD – Create

In this episode (episode 3) we are are going to cover the Read part of CRUD. MongoDB provides a query interface through the find function.We are going to demonstrate Read by doing find queries on a collection
hosted in MongoDB Atlas. The MongoDB
connection string is:

mongodb+srv://demo:demo@demodata-rgl39.mongodb.net/test?retryWrites=true

This is a cluster running a database called demo with a single collection called zipcodes. Every ZIP code in the US is in this database. To connect to this cluster we are going to use the Python shell.

$ cd ep003
$ pipenv shell
Launching subshell in virtual environment…
JD10Gen:ep003 jdrumgoole$  . /Users/jdrumgoole/.local/share/virtualenvs/ep003-blzuFbED/bin/activate
(ep003-blzuFbED) JD10Gen:ep003 jdrumgoole$ python
Python 3.6.5 (v3.6.5:f59c0932b4, Mar 28 2018, 03:03:55)
[GCC 4.2.1 (Apple Inc. build 5666) (dot 3)] on darwin
Type "help", "copyright", "credits" or "license" for more information.
>>>
>>> from pymongo import MongoClient
>>> client = MongoClient(host="mongodb+srv://demo:demo@demodata-rgl39.mongodb.net/test?retryWrites=true")
>>> db = client["demo"]
>>> zipcodes=db["zipcodes"]
>>> zipcodes.find_one()
{'_id': '01069', 'city': 'PALMER', 'loc': [-72.328785, 42.176233], 'pop': 9778, 'state': 'MA'}
>>>

The find_one query will get the first record in the collection. You can see
the structure of the fields in the returned document. The _id is the ZIP code.
The city is the city name. The loc is the GPS coordinates of each ZIP code. The pop is the population size and the state is the two letter state code.
We are connecting with the default user demo with the password demo. This
user only has read-only access to this database and collection.

So what if we want to select all the ZIP codes for a particular city?

Querying in MongoDB consists of constructing a partial JSON document that matches the fields you want to select on. So to get all the ZIP codes in the city of PALMER we use the following query

>>> zipcodes.find({'city': 'PALMER'})

>>>

Note we are using find() rather than find_one() as we want to return
all the matching documents. In this case find() will return a
cursor.

To print the cursor contents just keep calling .next() on the cursor
as follows:

>>> cursor=zipcodes.find({'city': 'PALMER'})
>>> cursor.next()
{'_id': '01069', 'city': 'PALMER', 'loc': [-72.328785, 42.176233], 'pop': 9778, 'state': 'MA'}
>>> cursor.next()
{'_id': '37365', 'city': 'PALMER', 'loc': [-85.564272, 35.374062], 'pop': 1685, 'state': 'TN'}
>>> cursor.next()
{'_id': '50571', 'city': 'PALMER', 'loc': [-94.543155, 42.641871], 'pop': 1119, 'state': 'IA'}
>>> cursor.next()
{'_id': '66962', 'city': 'PALMER', 'loc': [-97.112214, 39.619165], 'pop': 276, 'state': 'KS'}
>>> cursor.next()
{'_id': '68864', 'city': 'PALMER', 'loc': [-98.241146, 41.178757], 'pop': 1142, 'state': 'NE'}
>>> cursor.next()
{'_id': '75152', 'city': 'PALMER', 'loc': [-96.679429, 32.438714], 'pop': 2605, 'state': 'TX'}
>>> cursor.next()
Traceback (most recent call last):
  File "", line 1, in 
  File "/Users/jdrumgoole/.local/share/virtualenvs/ep003-blzuFbED/lib/python3.6/site-packages/pymongo/cursor.py", line 1197, in next
    raise StopIteration
StopIteration

As you can see cursors follow the Python iterator protocol and will raise a StopIteration exception when the cursor is exhausted.

However, calling .next() continously is a bit of a drag. Instead you can
import the pymongo_shell package and call the print_cursor() function. It will print out twenty records at a time.

>>> from pymongo_shell import print_cursor
>>> print_cursor(zipcodes.find({'city': 'PALMER'}))
{'_id': '01069', 'city': 'PALMER', 'loc': [-72.328785, 42.176233], 'pop': 9778, 'state': 'MA'}
{'_id': '37365', 'city': 'PALMER', 'loc': [-85.564272, 35.374062], 'pop': 1685, 'state': 'TN'}
{'_id': '50571', 'city': 'PALMER', 'loc': [-94.543155, 42.641871], 'pop': 1119, 'state': 'IA'}
{'_id': '66962', 'city': 'PALMER', 'loc': [-97.112214, 39.619165], 'pop': 276, 'state': 'KS'}
{'_id': '68864', 'city': 'PALMER', 'loc': [-98.241146, 41.178757], 'pop': 1142, 'state': 'NE'}
{'_id': '75152', 'city': 'PALMER', 'loc': [-96.679429, 32.438714], 'pop': 2605, 'state': 'TX'}
>>>

If we don’t need all the fields in the doc we can use
projection to remove some fields. This is a second doc argument to the find() function. This doc can specify the fields to return explicitly.

>>> print_cursor(zipcodes.find({'city': 'PALMER'}, {'city':1,'pop':1}))
{'_id': '01069', 'city': 'PALMER', 'pop': 9778}
{'_id': '37365', 'city': 'PALMER', 'pop': 1685}
{'_id': '50571', 'city': 'PALMER', 'pop': 1119}
{'_id': '66962', 'city': 'PALMER', 'pop': 276}
{'_id': '68864', 'city': 'PALMER', 'pop': 1142}
{'_id': '75152', 'city': 'PALMER', 'pop': 2605}

To include multiple fields in a query just add them to query doc. Each field is
treated as a boolean and to select the documents that will be returned.

>>> print_cursor(zipcodes.find({'city': 'PALMER', 'state': 'MA'}, {'city':1,'pop':1}))
{'_id': '01069', 'city': 'PALMER', 'pop': 9778}
>>>

To pick documents with one field or the other we can use the $or operator.

>>> print_cursor(zipcodes.find({ '$or' : [ {'city': 'PALMER' }, {'state': 'MA'}]}))
{'_id': '01069', 'city': 'PALMER', 'loc': [-72.328785, 42.176233], 'pop': 9778, 'state': 'MA'}
{'_id': '01002', 'city': 'CUSHMAN', 'loc': [-72.51565, 42.377017], 'pop': 36963, 'state': 'MA'}
{'_id': '01012', 'city': 'CHESTERFIELD', 'loc': [-72.833309, 42.38167], 'pop': 177, 'state': 'MA'}
{'_id': '01073', 'city': 'SOUTHAMPTON', 'loc': [-72.719381, 42.224697], 'pop': 4478, 'state': 'MA'}
{'_id': '01096', 'city': 'WILLIAMSBURG', 'loc': [-72.777989, 42.408522], 'pop': 2295, 'state': 'MA'}
{'_id': '01262', 'city': 'STOCKBRIDGE', 'loc': [-73.322263, 42.30104], 'pop': 2200, 'state': 'MA'}
{'_id': '01240', 'city': 'LENOX', 'loc': [-73.271322, 42.364241], 'pop': 5001, 'state': 'MA'}
{'_id': '01370', 'city': 'SHELBURNE FALLS', 'loc': [-72.739059, 42.602203], 'pop': 4525, 'state': 'MA'}
{'_id': '01340', 'city': 'COLRAIN', 'loc': [-72.726508, 42.67905], 'pop': 2050, 'state': 'MA'}
{'_id': '01462', 'city': 'LUNENBURG', 'loc': [-71.726642, 42.58843], 'pop': 9117, 'state': 'MA'}
{'_id': '01473', 'city': 'WESTMINSTER', 'loc': [-71.909599, 42.548319], 'pop': 6191, 'state': 'MA'}
{'_id': '01510', 'city': 'CLINTON', 'loc': [-71.682847, 42.418147], 'pop': 13269, 'state': 'MA'}
{'_id': '01569', 'city': 'UXBRIDGE', 'loc': [-71.632869, 42.074426], 'pop': 10364, 'state': 'MA'}
{'_id': '01775', 'city': 'STOW', 'loc': [-71.515019, 42.430785], 'pop': 5328, 'state': 'MA'}
{'_id': '01835', 'city': 'BRADFORD', 'loc': [-71.08549, 42.758597], 'pop': 12078, 'state': 'MA'}
{'_id': '01845', 'city': 'NORTH ANDOVER', 'loc': [-71.109004, 42.682583], 'pop': 22792, 'state': 'MA'}
{'_id': '01851', 'city': 'LOWELL', 'loc': [-71.332882, 42.631548], 'pop': 28154, 'state': 'MA'}
{'_id': '01867', 'city': 'READING', 'loc': [-71.109021, 42.527986], 'pop': 22539, 'state': 'MA'}
{'_id': '01906', 'city': 'SAUGUS', 'loc': [-71.011093, 42.463344], 'pop': 25487, 'state': 'MA'}
{'_id': '01929', 'city': 'ESSEX', 'loc': [-70.782794, 42.628629], 'pop': 3260, 'state': 'MA'}
Hit Return to continue

We can do range selections by using the $lt and $gtoperators.

>>> print_cursor(zipcodes.find({'pop' : { '$lt':8, '$gt':5}}))
{'_id': '05901', 'city': 'AVERILL', 'loc': [-71.700268, 44.992304], 'pop': 7, 'state': 'VT'}
{'_id': '12874', 'city': 'SILVER BAY', 'loc': [-73.507062, 43.697804], 'pop': 7, 'state': 'NY'}
{'_id': '32830', 'city': 'LAKE BUENA VISTA', 'loc': [-81.519034, 28.369378], 'pop': 6, 'state': 'FL'}
{'_id': '59058', 'city': 'MOSBY', 'loc': [-107.789149, 46.900453], 'pop': 7, 'state': 'MT'}
{'_id': '59242', 'city': 'HOMESTEAD', 'loc': [-104.591805, 48.429616], 'pop': 7, 'state': 'MT'}
{'_id': '71630', 'city': 'ARKANSAS CITY', 'loc': [-91.232529, 33.614328], 'pop': 7, 'state': 'AR'}
{'_id': '82224', 'city': 'LOST SPRINGS', 'loc': [-104.920901, 42.729835], 'pop': 6, 'state': 'WY'}
{'_id': '88412', 'city': 'BUEYEROS', 'loc': [-103.666894, 36.013541], 'pop': 7, 'state': 'NM'}
{'_id': '95552', 'city': 'MAD RIVER', 'loc': [-123.413994, 40.352352], 'pop': 6, 'state': 'CA'}
{'_id': '99653', 'city': 'PORT ALSWORTH', 'loc': [-154.433803, 60.636416], 'pop': 7, 'state': 'AK'}
>>>

Again sets of $lt and $gt are combined as a boolean and. if you need different logic you can use the boolean operators.

Conclusion

Today we have seen how to query documents using a query template, how to reduce the output using projections and how to create more complex queries using boolean and $lt and $gt operators.

Next time we will talk about the Update portion of CRUD.

MongoDB has a very rich and full featured query language including support
for querying using full-text, geo-spatial coordinates and nested queries.
Give the query language a spin with the Python shell using the tools we
outlined above. The complete zip codes data set is publicly available for read
queries at the MongoDB URI:

mongodb+srv://demo:demo@demodata-rgl39.mongodb.net/test?retryWrites=true”

Try MongoDB Atlas via the free-tier
today. A free MongoDB cluster for your own personal use forever!
PyMongo Monday Episode 2 : Create

Last time we showed you how to setup up your environment.

In the next few episodes we will take you through the standard CRUD operators that every database is expected to support. In this episode we will focus on the Create in CRUD.

Create

Lets look at how we insert JSON documents into MongoDB.

First lets start a local single instance of mongod using m.

$ m use stable
2018-08-28T14:58:06.674+0100 I CONTROL [main] Automatically disabling TLS 1.0, to force-enable TLS 1.0 specify --sslDisabledProtocols 'none'
2018-08-28T14:58:06.689+0100 I CONTROL [initandlisten] MongoDB starting : pid=43658 port=27017 dbpath=/data/db 64-bit host=JD10Gen.local
2018-08-28T14:58:06.689+0100 I CONTROL [initandlisten] db version v4.0.2
2018-08-28T14:58:06.689+0100 I CONTROL [initandlisten] git version: fc1573ba18aee42f97a3bb13b67af7d837826b47
2018-08-28T14:58:06.689+0100 I CONTROL [initandlisten] allocator: system

etc...

The mongod starts listening on port 27017 by default. As every MongoDB driver
defaults to connecting on localhost:27017 we won’t need to specify a connection string explicitly in these early examples.

Now, we want to work with the Python driver. These examples are using Python
3.6.5 but everything should work with versions as old as Python 2.7 without problems.

Unlike SQL databases, databases and collections in MongoDB only have to be named to be created. As we will see later this is a lazy creation process, and the database and corresponding collection are actually only created when a document is inserted.

$ python
Python 3.6.5 (v3.6.5:f59c0932b4, Mar 28 2018, 03:03:55)
[GCC 4.2.1 (Apple Inc. build 5666) (dot 3)] on darwin
Type "help", "copyright", "credits" or "license" for more information.
>>>
>>> import pymongo
>>> client = pymongo.MongoClient()
>>> database = client[ "ep002" ]
>>> people_collection = database[ "people_collection" ]
>>> result=people_collection.insert_one({"name" : "Joe Drumgoole"})
>>> result.inserted_id
ObjectId('5b7d297cc718bc133212aa94')
>>> result.acknowledged
True
>>> people_collection.find_one()
{'_id': ObjectId('5b62e6f8c3b498fbfdc1c20c'), 'name': 'Joe Drumgoole'}
True
>>>

First we import the pymongo library (line 6). Then we create the local client proxy object,
client = pymongo.MongoClient() (line 7) . The client object manages a connection pool to the server and can be used to set many operational parameters related to server connections.

We can leave the parameter list to the MongoClient call blank. Remember, the server by default listens on port 27017 and the client by default attempts to connect to localhost:27017.

Once we have a client object, we can now create a database, ep002 (line 8)
and a collection, people_collection (line 9). Note that we do not need an explicit DDL statement.

Using Compass to examine the database server

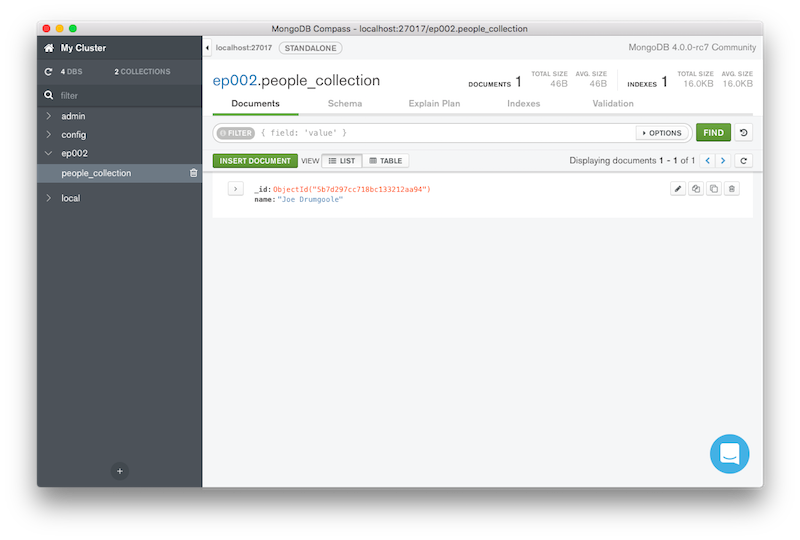
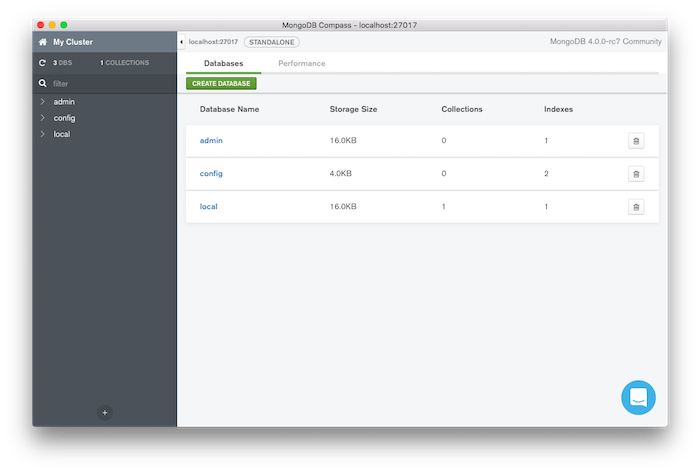
A database is effectively a container for collections. A collection provides a container for documents. Neither the database nor the collection will be created on the server until you actually insert a document. If you check the server by connecting MongoDB Compass you will see that there are no databases or collections on this server before the insert_one call.

screen shot of compass at start

These commands are lazily evaluated. So, until we actually insert a document into the collection, nothing happens on the server.

Once we insert a document:

>>>> result=database.people_collection.insert_one({"name" : "Joe Drumgoole"})
>>> result.inserted_id
ObjectId('5b7d297cc718bc133212aa94')
>>> result.acknowledged
True
>>> people_collection.find_one()
{'_id': ObjectId('5b62e6f8c3b498fbfdc1c20c'), 'name': 'Joe Drumgoole'}
True
>>>

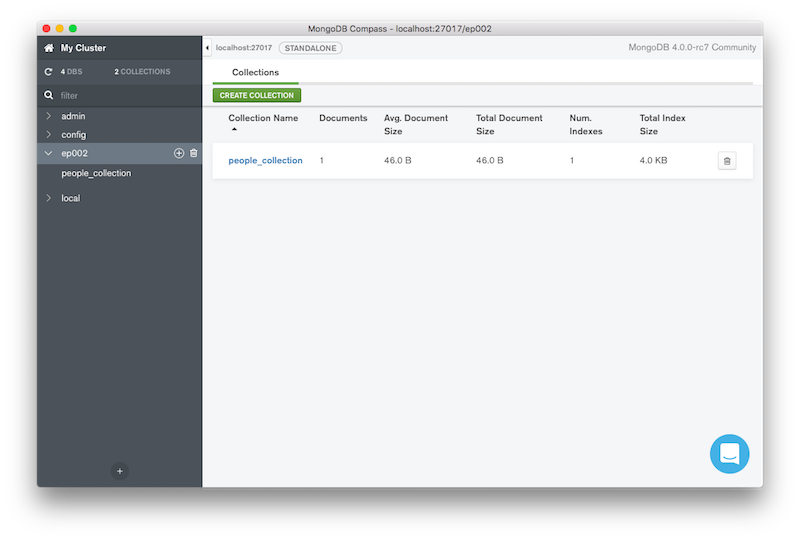
We will see that the database, the collection, and the document are created.

screen shot of compass with collection

And we can see the document in the database.

screen shot of compass with document

_id Field

Every object that is inserted into a MongoDB database gets an automatically
generated _id field. This field is guaranteed to be unique for every document
inserted into the collection. This unique property is enforced as the _id field
is automatically indexed
and the index is unique.

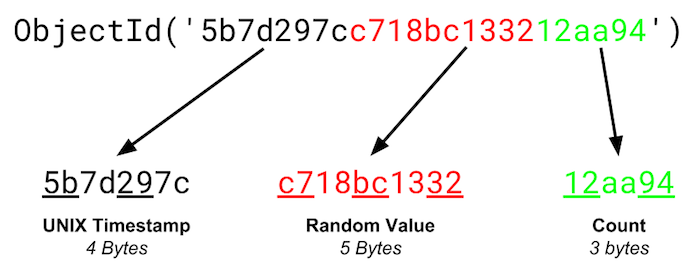
The value of the _id field is defined as follows:

ObjectID

The _id field is generated on the client and you can see the PyMongo generation code in the objectid.py file. Just search for the def _generate string. All MongoDB drivers generate _id fields on the client side. The _id field allows us to insert the same JSON object many times and allow each one to be uniquely identified. The _id field even gives a temporal ordering and you can get this from an ObjectID via the generation_time method.

>>> from bson import ObjectId
>>> x=ObjectId('5b7d297cc718bc133212aa94')
>>> x.generation_time
datetime.datetime(2018, 8, 22, 9, 14, 36, tzinfo=)
>>> print(x.generation_time)
2018-08-22 09:14:36+00:00
>>>

Wrap Up

That is create in MongoDB. We started a mongod instance, created a MongoClient proxy, created a database and a collection and finally made then spring to life by inserting a document.

Next up we will talk more abou Read part of CRUD. In MongoDB this is the find query which we saw a little bit of earlier on in this episode.


For direct feedback please pose your questions on twitter/jdrumgoole that way everyone can see the answers.

The best way to try out MongoDB is via MongoDB Atlas our Database as a Service.
It’s free to get started with MongoDB Atlas so give it a try today.

PyMongo Monday: Episode 1: Setting Up Your PyMongo Environment

20170404_090123
Front Square, Trinity College, Dublin

Welcome to PyMongo Monday. This is the first in a series of regular blog posts that will introduce developers to programming MongoDB using the Python programming language. It’s called PyMongo Monday because PyMongo is the name of the client library (in MongoDB speak we refer to it as a “driver”) we used to interact with the MongoDB Server. Monday because we aim to release each new episode on Monday.

To get started we need to install the toolchain that a typical MongoDB Python developer would expect to use.

Installing m

First up is m. Hard to find online unless your search for MongoDB m, m is a tool to manage and use multiple installations of the MongoDB Server in parallel. It is an invaluable tool if you want to try out the latest and greatest beta version but still continue mainline development on our current stable release.

The easiest way to install m is with npm the Node.js package manager (which it turns out is not just for Node.js).

$ npm install -g m
Password:******
/usr/local/bin/m -> /usr/local/lib/node_modules/m/bin/m
+ m@1.4.1
updated 1 package in 2.361s
$

If you can’t or don’t want to use npm you can download and install directly from the github repo. See the README there for details.

For today we will use m to install the current stable production version (4.0.2 at the time of writing).

We run the stable command to achieve this.

$ m stable
MongoDB version 4.0.2 is not installed.
Installation may take a while. Would you like to proceed? [y/n] <b>y</b>
... installing binary

######################################################################## 100.0%
/Users/jdrumgoole
... removing source
... installation complete
$

If you need to use the path directly in another program you can get that with m bin.

$ m bin 4.0.0
/usr/local/m/versions/4.0.1/bin
$

To run the corresponding binary do m use stable

$ m use stable
2018-08-28T11:41:48.157+0100 I CONTROL [main] Automatically disabling TLS 1.0, to force-enable TLS 1.0 specify --sslDisabledProtocols 'none'
2018-08-28T11:41:48.171+0100 I CONTROL [initandlisten] MongoDB starting : pid=38524 port=27017 dbpath=/data/db 64-bit host=JD10Gen.local
2018-08-28T11:41:48.171+0100 I CONTROL [initandlisten] db version v4.0.2
2018-08-28T11:41:48.171+0100 I CONTROL [initandlisten] git version: fc1573ba18aee42f97a3bb13b67af7d837826b47
<b><i>&lt other server output &gt</i></b>
<b>...</b>
2018-06-13T15:52:43.648+0100 I NETWORK [initandlisten] waiting for connections on port 27017

Now that we have a server running we can confirm that it works by connecting via the
mongo shell.

$ mongo
MongoDB shell version v4.0.0
connecting to: mongodb://127.0.0.1:27017
MongoDB server version: 4.0.0
Server has startup warnings:
2018-07-06T10:56:50.973+0100 I CONTROL [initandlisten]
2018-07-06T10:56:50.973+0100 I CONTROL [initandlisten] ** WARNING: Access control is not enabled for the database.
2018-07-06T10:56:50.973+0100 I CONTROL [initandlisten] ** Read and write access to data and configuration is unrestricted.
2018-07-06T10:56:50.973+0100 I CONTROL [initandlisten] ** WARNING: You are running this process as the root user, which is not recommended.
2018-07-06T10:56:50.973+0100 I CONTROL [initandlisten]
2018-07-06T10:56:50.973+0100 I CONTROL [initandlisten] ** WARNING: This server is bound to localhost.
2018-07-06T10:56:50.973+0100 I CONTROL [initandlisten] ** Remote systems will be unable to connect to this server.
2018-07-06T10:56:50.973+0100 I CONTROL [initandlisten] ** Start the server with --bind_ip &lt address&gt to specify which IP
2018-07-06T10:56:50.973+0100 I CONTROL [initandlisten] ** addresses it should serve responses from, or with --bind_ip_all to
2018-07-06T10:56:50.973+0100 I CONTROL [initandlisten] ** bind to all interfaces. If this behavior is desired, start the
2018-07-06T10:56:50.973+0100 I CONTROL [initandlisten] ** server with --bind_ip 127.0.0.1 to disable this warning.
2018-07-06T10:56:50.973+0100 I CONTROL [initandlisten]

---
Enable MongoDB's free cloud-based monitoring service to collect and display
metrics about your deployment (disk utilization, CPU, operation statistics,
etc).

The monitoring data will be available on a MongoDB website with a unique URL created for you. Anyone you share the URL with will also be able to view this page. MongoDB may use this information to make product improvements and to suggest MongoDB products and deployment options to you.

To enable free monitoring, run the following command: db.enableFreeMonitoring()
---

>

These warnings are standard. They flag that this database has no access controls set up by default andthat it is only listening to connections coming from the machine it is running on (localhost). We will learn how to set up access control and listen on a broader range of ports in later episodes.

Installing the PyMongo Driver

But this series is not about the MongoDB Shell, which uses JavaScript as its coin of the realm, it’s about Python. How do we connect to the database with Python?

First, we need to install the MongoDB Python Driver, PyMongo. In MongoDB parlance a driver is a language-specific client library used to allow developers to interact with the server in the idiom of their own programming language.

For Python that means the driver is installed using pip. In node.js the driver is installed using npm and in Java you can use maven.

$ pip3 install pymongo
Collecting pymongo
Downloading https://files.pythonhosted.org/packages/a1/e0/51df08036e04c1ddc985a2dceb008f2f21fc1d6de711bb6cee85785c1d78/pymongo-3.7.1-cp27-cp27m-macosx_10_13_intel.whl (333kB)
100% |████████████████████████████████| 337kB 4.1MB/s
Installing collected packages: pymongo
Successfully installed pymongo-3.7.1
$

We recommend you use a virtual environment to isolate your PyMongo Monday code. This is not required but is very convenient for isolating different development streams.

Now we can connect to the database:

$ python
Python 3.6.5 (v3.6.5:f59c0932b4, Mar 28 2018, 03:03:55)
[GCC 4.2.1 (Apple Inc. build 5666) (dot 3)] on darwin
Type "help", "copyright", "credits" or "license" for more information.
>>> import pymongo
>>> client = pymongo.MongoClient(host="mongodb://localhost:8000")
>>> result = client.admin.command("isMaster")
>>> import pprint
>>> pprint.pprint(result)
{'ismaster': True,
'localTime': datetime.datetime(2018, 6, 13, 21, 55, 2, 272000),
'logicalSessionTimeoutMinutes': 30,
'maxBsonObjectSize': 16777216,
'maxMessageSizeBytes': 48000000,
'maxWireVersion': 6,
'maxWriteBatchSize': 100000,
'minWireVersion': 0,
'ok': 1.0,
'readOnly': False}
>>>

First we import the PyMongo library (line 5). The we create a local client object (line 6) that holds the connection pool and other status for this server. We generally don’t want more than one MongoClient object per program as it provides its own connection pool.

Now we are ready to issue a command to the server. In this case its the standard MongoDB server information command which is called rather anachronistically isMaster (line 7). This is a hangover from the very early versions of MongoDB. It appears in pre 1.0 versions of MongoDB ()which is over ten years old at this stage).

The isMaster command returns a dict which details a bunch of server information. In order to format this in a more readable way import the pprint library.

#Conclusion
That’s the end of episode one. We have installed MonogDB, installed the Python client library (aka driver),started a mongod server and established a connection between the client and server.

Next week we will introduce CRUD operations on MongoDB starting with Create.

For direct feedback please pose your questions on twitter/jdrumgoole that way everyone can see the answers.

The best way to try out MongoDB is via MongoDB Atlas our Database as a Service. You can deploy a free cluster without giving us a credit card.

Full Stack Hack – A Learning Hackathon

Screen Shot 2018-04-20 at 10.08.47

Next Thursday (26th April) and Friday (27th April) we are running a Full Stack Hackathon in London. The goal of the Hackathon is to give you, the developer a chance to work with three of the most compelling technologies for building modern Applications, specifically Node.js,  Apacha Kafka and MongoDB.

Why these three technologies? Well, they are all at the forefront of the revolution in MicroServices and scalable web architectures, they are all Open Source and they all put the JSON data format front and centre of their design.

At 7.00pm on Thursday we will all get together at 15 Hatfields in London to start building teams.


Each team can have a minimum of two and a maximum of 5 team members. If you want to build a team and you have an idea, this is the time to pitch your ideas. Focus on the idea of a Minimum Viable Product.

Remember you only have Friday to build your app. There will be plenty of pizza beer and soft-drinks on hand to ensure no one goes hungry or thirsty. Everyone who turns up will get swag bag of goodies from all the vendors including tee-shirts, pens, stickers etc. etc.

On Friday we start bright and early.  The team will be there from 8.00an but we expect people to arrive at 9.00am. We will provide breakfast rolls, tea and coffee and we will refresh the pitches from last night. This is when we finalise the teams for the day.

After that its full speed hacking until 4.30pm. There will be a break for lunch which we will provide and there will be snacks and soft-drinks available throughout the day.

There will be experts on hand from Nearform, MongoDB and Confluent to help you with your hacking challenge.

At 4.30pm, each team will pitch and demo their projects. Each team gets 5 minutes. Then myself, Tim Berglund and Conor O’Neill will decide on a winner.  Each member of the winning team will receive an Amazon Echo Dot.

What will the winning team look like? They will have used all the technologies in a compelling way to build a minimum viable product that blows our socks off.

Once prize giving is done we will retire to a local pub to celebrate the day with craft beer. We are buying!

All this for the low low fee of £10.  Register now, spaces are limited. We can’t wait to see you on the day.


Connecting to MongoDB Atlas

Atlas is the MongoDB database as a service offering. With Atlas, you can create fully managed MongoDB databases on AWS, Google Cloud, and Azure. If you have been playing around with MongoDB locally you will know how trivially easy it is for clients and servers to connect.

Servers listen by default on port 27017 and clients by default expect to connect to localhost:27017. With Atlas, we need to connect to a remote server that expects both a username and password and an SSL connection.  But don’t worry Atlas makes this super easy to configure.

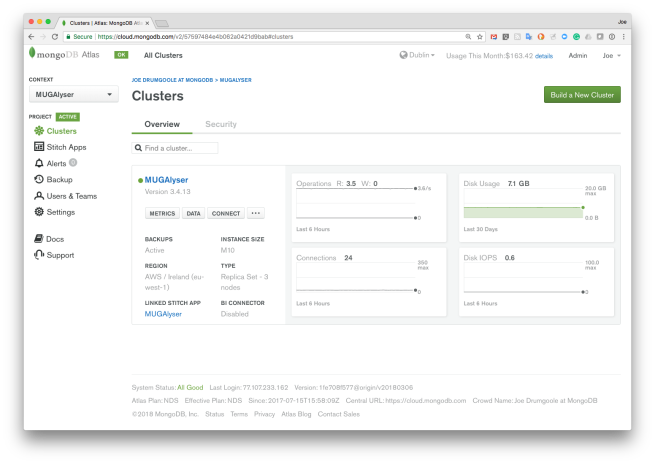
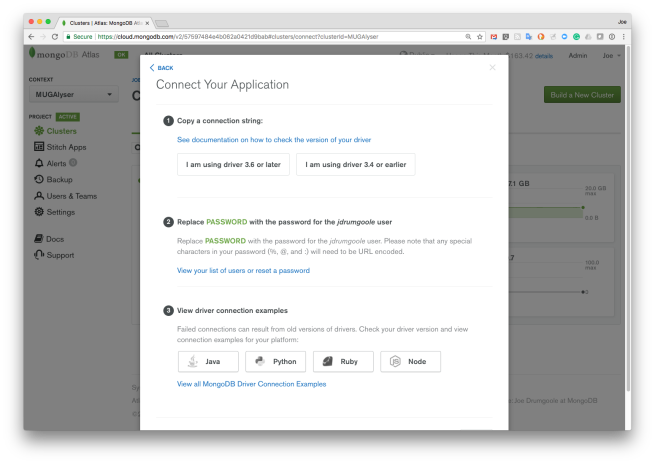
First login to your Atlas cluster at cloud.mongodb.com. Here is my login page.

Screen Shot 2018-03-22 at 09.49.15

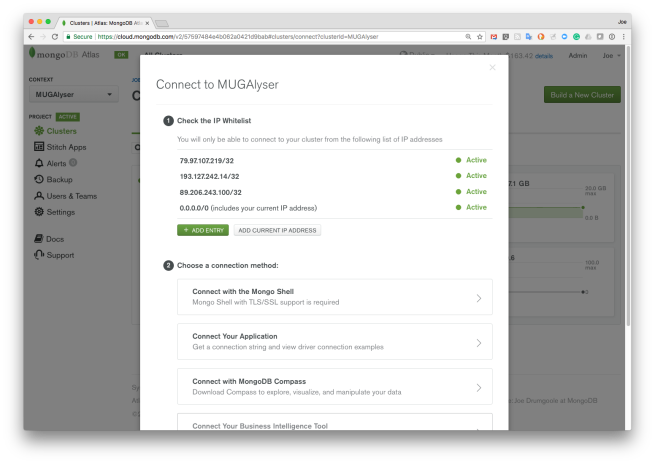
Now click the connect button. This will pop up the following screen.

Screen Shot 2018-03-22 at 09.49.31

You want to scroll down to the Connect Your Application and click there.

This will open up the Connection string screen.

Screen Shot 2018-03-22 at 09.49.46

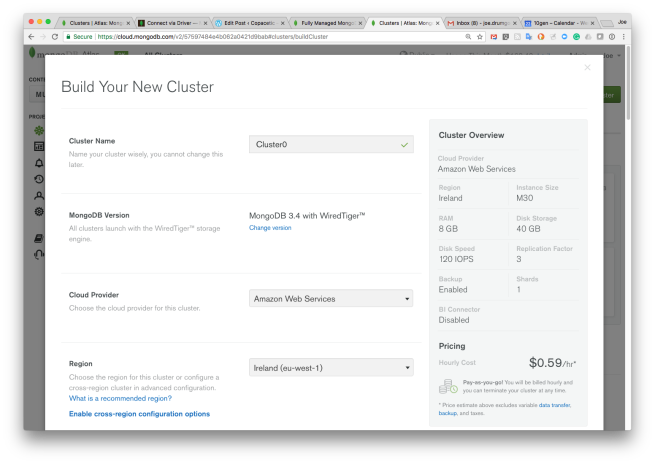
You now need to decide whether you are using the latest drivers (3.6) or an earlier version. When you originally created the cluster you selected a specific version of the server on the Create cluster page.

Screen Shot 2018-03-22 at 10.18.26

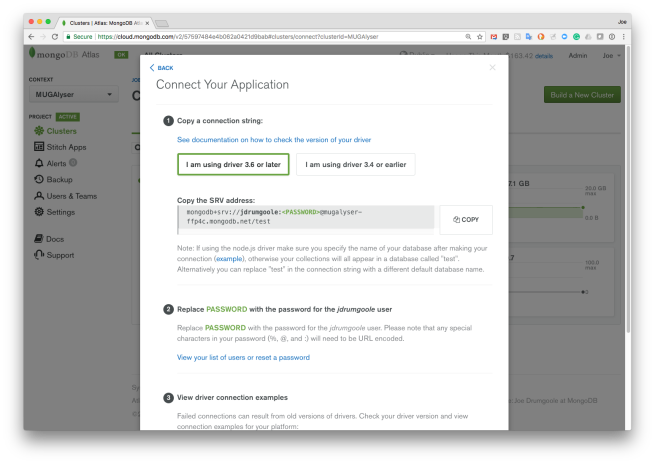
If you are using a 3.6 driver then the server will be configured to use the new seedlist configuration format.

If you click on that link you will get a window displaying the correct connection string.

Screen Shot 2018-03-22 at 09.50.01.png

This string is hard to read on the screenshot so we can reproduce it here.

mongodb+srv://jdrumgoole:<PASSWORD>@mugalyser-ffp4c.mongodb.net/test

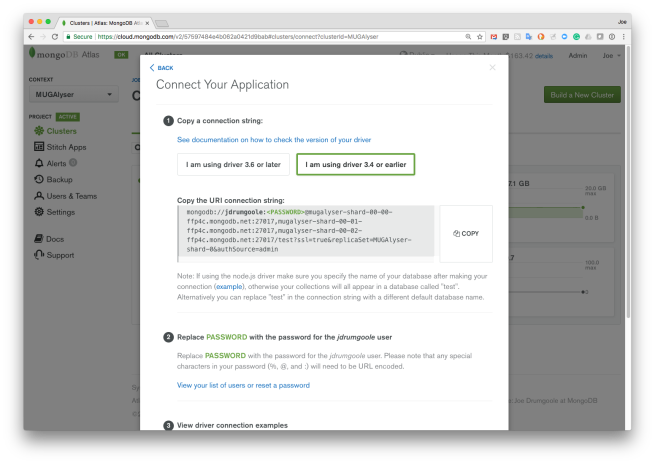
Screen Shot 2018-03-22 at 09.50.06

For the 3.4 and earlier drivers, we use the old format MongoDB URI connection string.

mongodb://jdrumgoole:<PASSWORD>@mugalyser-shard-00-00-ffp4c.mongodb.net:27017,mugalyser-shard-00-01-ffp4c.mongodb.net:27017,mugalyser-shard-00-02-ffp4c.mongodb.net:27017/test?ssl=true&replicaSet=MUGAlyser-shard-0&authSource=admin


In both cases, you will need to supply the password that you created for your user. Note this is the password for the database, not your Atlas login password.

Bitcoin Bubble?

soap-bubbles-817094_1920

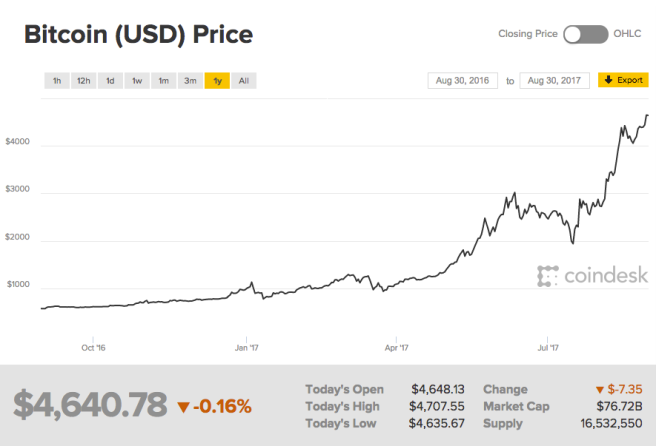
Around Christmas last year (2016) I was doing some internal training on Bitcoin and Blockchain for sales staff at MongoDB. This was nothing too heavy but as part of the process I reckoned that if I was going to understand this thing I would buy some as part of the process. I bought two tranches of €100, the first in December 2016 and the second (just before a talk at UCD on the same topic) in January 2017. There was a €3 transaction fee for each purchase.

I did occasionally look at the Bitcoin prices and watched its ups and downs. Eventually when it seemed to be at an all time high in May 2016 I cashed out my original €200. I kind of forgot about the residue until last night. I checked the price around 12pm.

€388 euro.

Feels bubblish to me 🙂

Screen Shot 2017-08-30 at 08.54.40

The Ultimate MVP : The Saturn 5 Rocket

Saturn 5 Rocket
Saturn 5 on its Launch pad

Most people in larger companies look at the lean-startup movement and think it doesn’t apply to them (despite much of its inspiration coming from a very large company, Toyota). Well NASA ran a very successful Minimum Viable Product through the 1960’s called the Apollo program.

The Apollo program had a simple goal, put a man on the moon.  Every part of the mission was dedicated to that end. So although the Saturn V rocket is the largest rocket every built it was completely disposable apart from the Command Module that returned to Earth with the astronauts. Even that was discarded once the astronauts had been recovered.

There was no attempt to design reuse for trips to other planets or reuse in the mission of space station building. They reused extensive design knowledge gained in the design of Mercury and  Gemini and space missions and focussed on design simplicity and remote monitoring as opposed to onboard maitainance to resolve problems.

Most importantly, they recognized that the short duration of Apollo missions meant that the parts and sub-systems did not need to undergo the rigor of prolonged testing in the harsh environment of Space.

They wouldn’t have called it that at the time but they were engaging in lean design and adopting lean startup principles.

  • Minimum Viable Product: A rocket to put a man on the moon and bring him back
  • Reuse of standard components: Many of the sub-systems for Gemini and Mercury were carried straight across
  • No Over design: Design for the current mission, a short duration trip to the Moon, no a long duration flight to Mars.
  • Rapid Iteration: 11 Apollo missions in 8 years culminating in Apollo 11 that put a man on the moon
  • Failed Experiments:  Apollo 1 resulted in a mission fire that killed all three astronauts, apollo

So next time someone says MVP is a the new new thing. Tell ’em about the Apollo program.

My Every Day Electronics Carry

everyday-carry

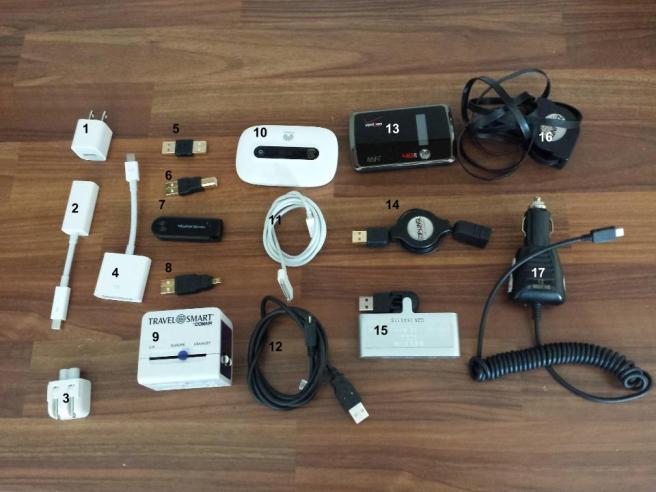
  1. US USB power adaptor
  2. Ethernet connector for MacBook Air (so far never used but its only been a month)
  3. US plug adaptor for Apple power block
  4. VGA dongle for Mac (amazingly this is the first one I bought and I still have it)
  5. USB to USB connector (male to female)
  6. USB to printer form factor connector
  7. USB dongle with attachment to allow it to read/write MicroSD cards
  8. Another USB form factor convertor
  9. Universal plug adaptor (works everywhere). Got this in Frys. Its great ‘cos it has a USB power point built in
  10. Three MIFI
  11. Mac iPad Cable (also can be used to charge iPhones)
  12. MicroUSB cable
  13. Verizon LTE MIFI (for USA)
  14. USB extension cable
  15. USB hub
  16. Ethernet (use to roll up but the spring is broken)
  17. MicroUSB car charger

Not shown is my MacBook Air, my Samsung Galaxy G4 and their associated chargers. I carry all this stuff in a transparent Ziplock bag so I can easily see what I am looking for. My backpack of choice (not shown) is a Lowe Alpine computer backpack, I favour it because it comes with a slip on waterproof cover which is great for cycling in Irish weather.